Custom Effects
Custom effects allow the user to create effects using the UE Materials that would otherwise be hard to produce with standard CSS methods.
New CSS properties
Custom effect rendering can be triggered for any HTML element by using the new custom property coh-custom-effect-name. This name will be passed to a delegate that requires the user to map the value of the property to a UMaterial instance that will be used for drawing the element.
Example
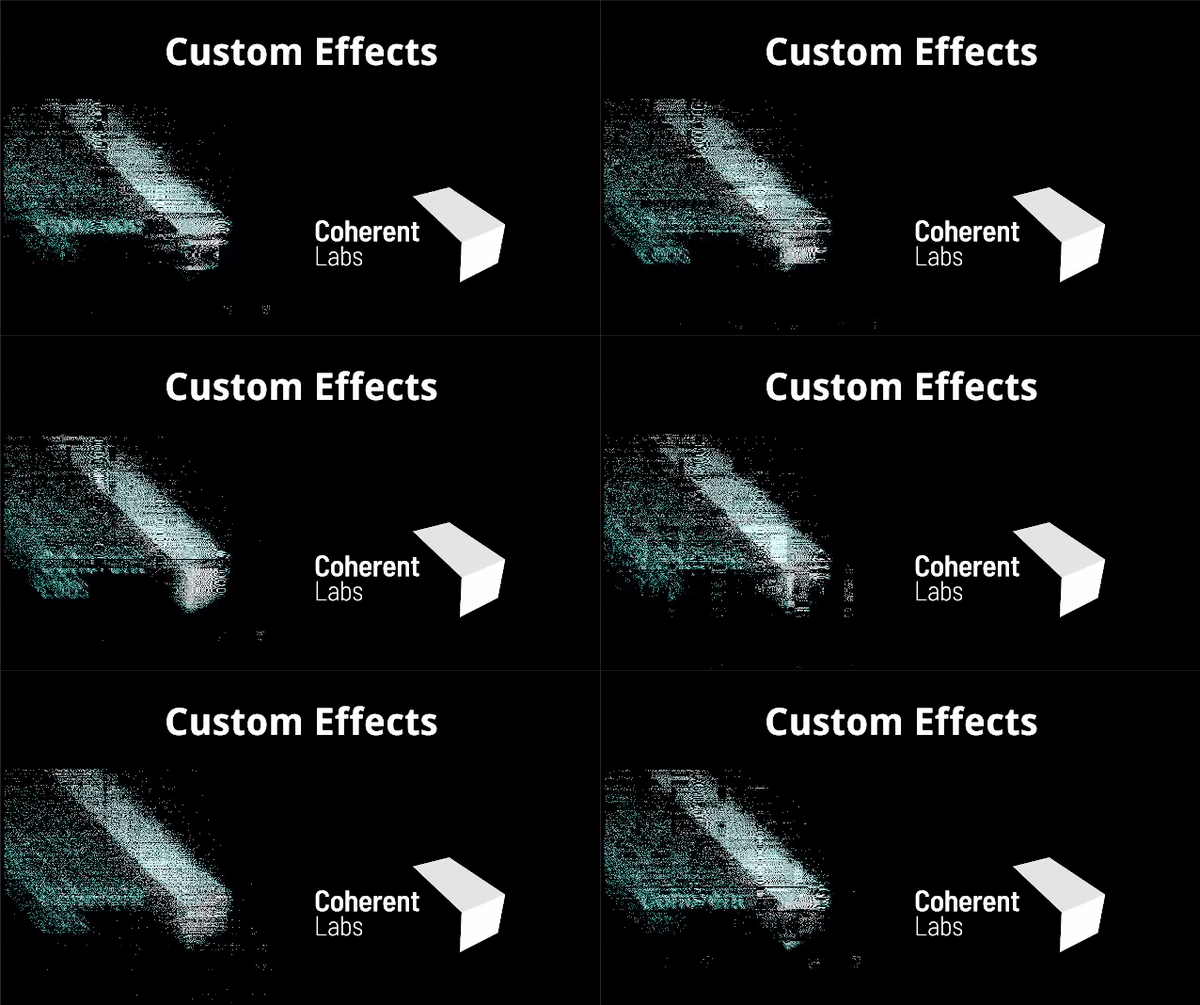
Our sample maps contain a custom effect example, accessible through the Sample HUB and located under Content/Maps/SampleMaps (the CustomEffectMap asset). Here’s what the sample looks like:
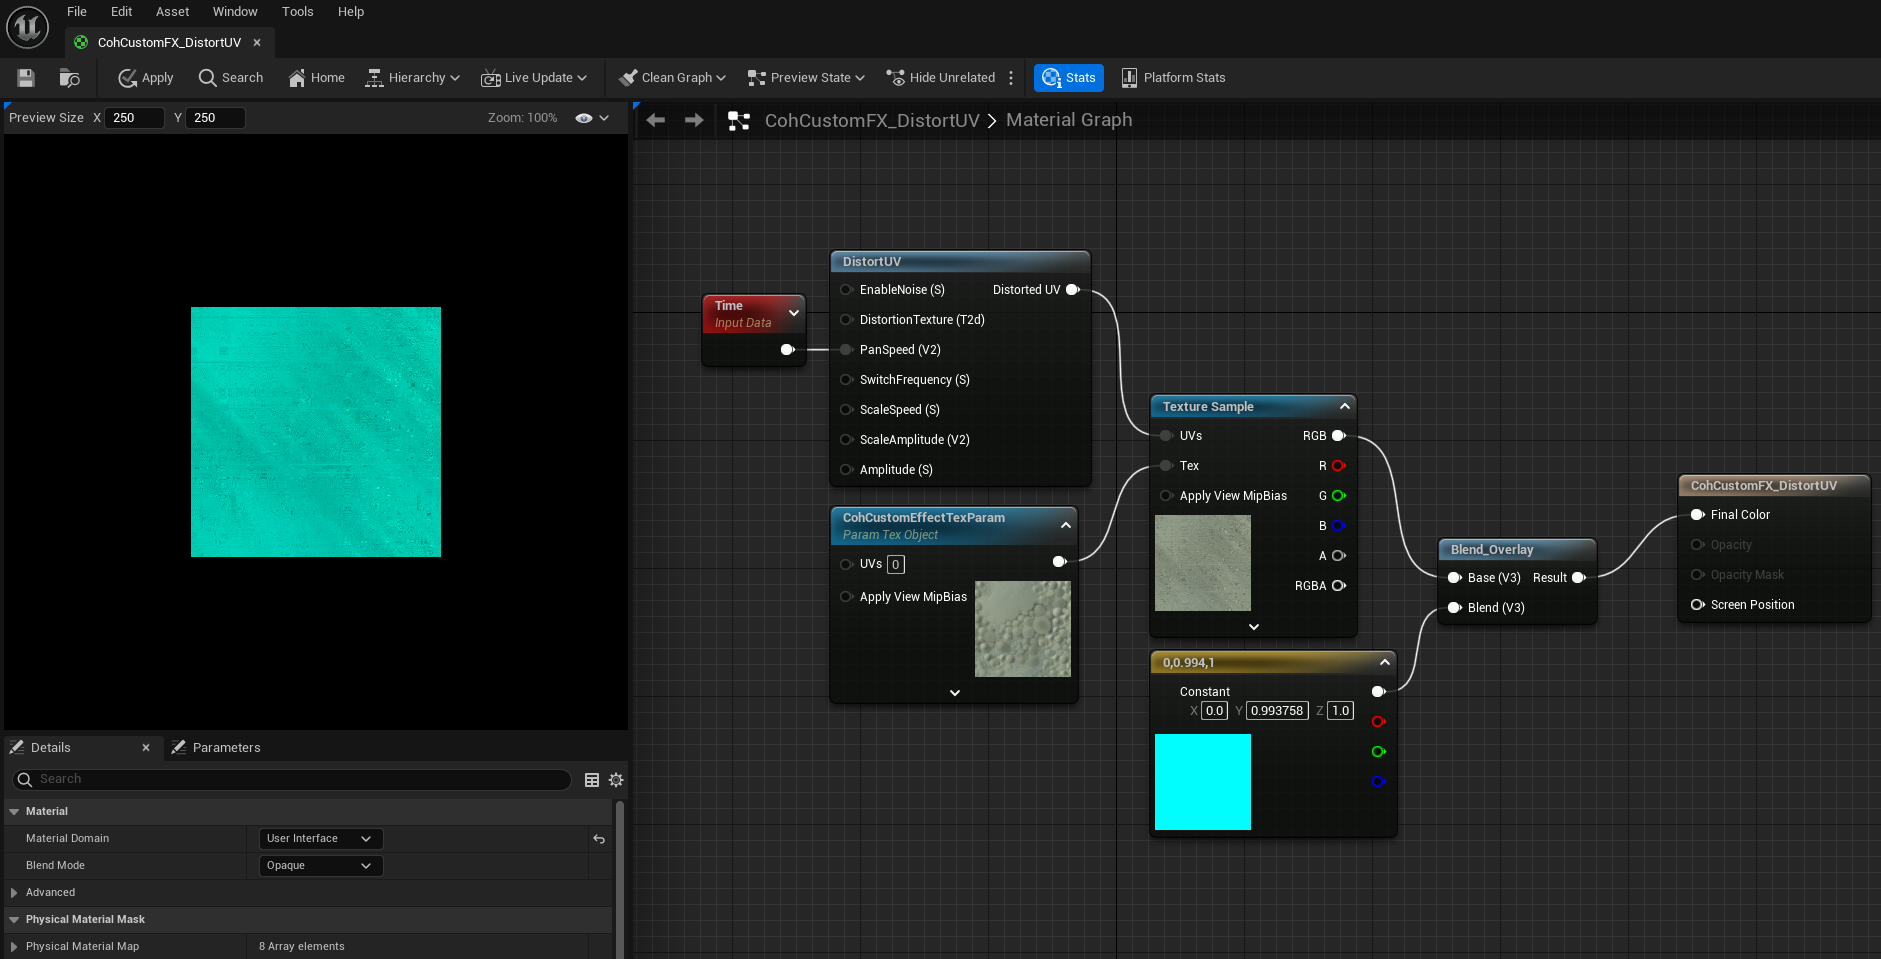
If you would like to see how the Material used in the sample is set up, please refer to the CohCustomFX_DistortUV asset located under Content/MapAssets/CustomEffect:
This is the HTML page that drives the effect parameters:
<!DOCTYPE html>
<html>
<head>
<title>Your View</title>
<style>
body {
    background-color: black;

}

.container {
    background-color: black;
    width: 100vw;
    height: 100vh;
    display: flex;
    flex-direction: row;
}

.distorted {
    background-color: black;
    background-image: url("cl_logo.png");
    background-size: 70%;
    background-position: 50% 50%;
    background-repeat: no-repeat;
    height: 80vh;
    width: 45%;
    coh-custom-effect-name: distorteffect; /* This enables custom rendering */
    animation: pulse 2s infinite;
    align-items: center;
}

.normal {
    background-color: black;
    background-image: url("cl_logo.png");
    background-size: 70%;
    background-position: 50% 50%;
    background-repeat: no-repeat;
    height: 80vh;
    width: 45%;
    align-items: center;
}

@keyframes pulse {
    from {
        /* This will be passed to the UE effect */
        opacity: 1;
    }
    to {
        /* This will be passed to the UE effect */
        opacity: 0.999;
    }
}

h1 {
    font-size: 5em;
    text-align: center;
    color: white;
}
</style>
</head>
<body>
<h1>Custom Effects</h1>
<div class="container">
    <div class="distorted"></div>
    <div class="normal"></div>
</div>

<script src="../javascript/cohtml.js"></script>

</body>
</html>
Quick usage guide
Configuring your View
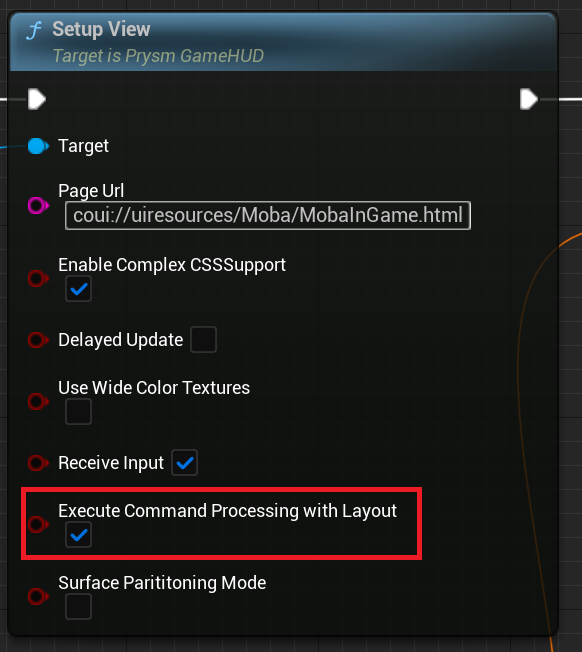
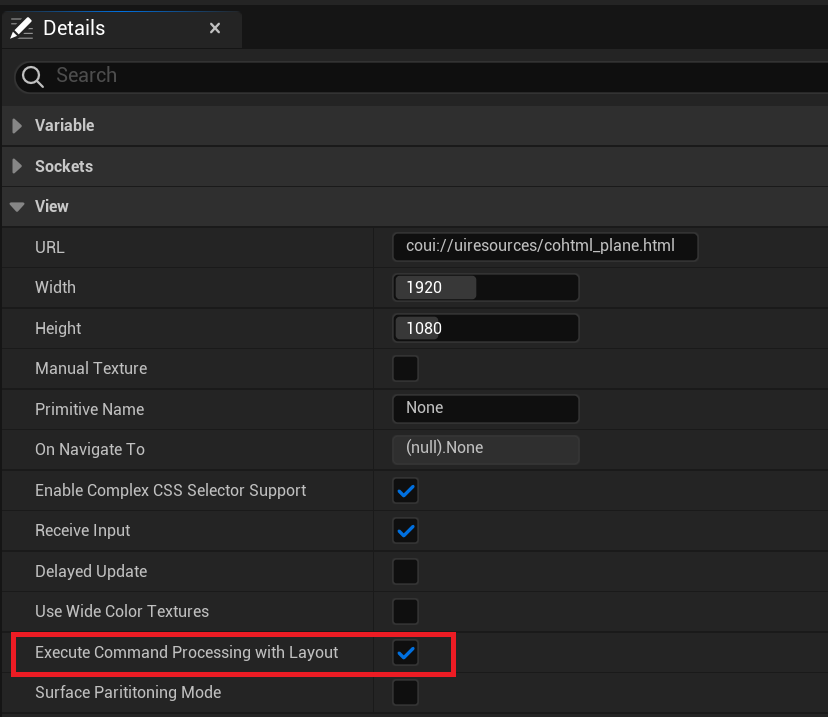
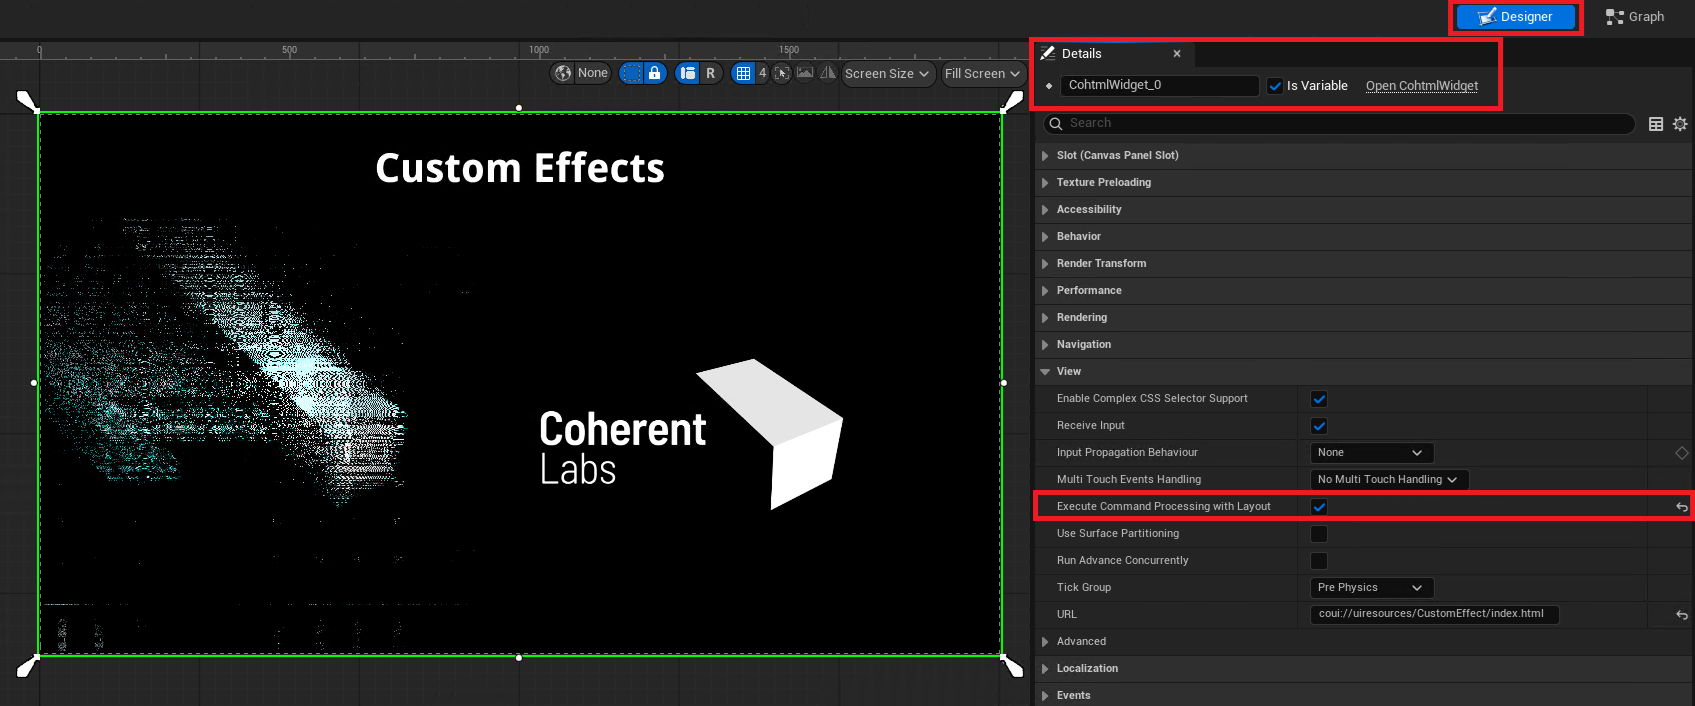
When setting up a given Prysm View for Custom Effects, you first need to enable the ExecuteCommandProcessingWithLayout option. There are a number of ways you can toggle this option, depending on the type of View you are using:
- If you are using a
HUDcomponent (akaACohtmlGameHUD), you can call theSetup ViewBlueprint function when setting up yourView:
- For a
CohtmlComponent(for in-worldViewsattached toActors), you can modify this option through theDetailspanel:
- For a
UMG Widget HUDor an in-worldWidget Component(for in-worldViewsattached toActorsthroughWidgetComponents), you can modify this option through theDesigner’sDetailspanel:
Declaring your CSS Custom Effect names through C++
- In the HTML/CSS code, add the new
coh-custom-effect-name: myEffect;CSS property to the element you want to render with a custom effect. - Bind a handler to the
ICohtmlPlugin::Get().OnMapMaterialNamedelegate- The handler is given an
FStringwith the providedcoh-custom-effect-name(in this example it will bemyEffect) and must return aUMaterial*that will execute the custom effect.- The
UMaterialmust conform to the requirements listed in the “Required fields” section.
- The
- The handler is given an
- (Optional) Bind a handler to the
ICohtmlPlugin::Get().OnBindCustomEffectParametersdelegate if you intend to use custom parameters. - The element will now be drawn using your UE Material!
All of the steps above are explained in detail below.
Additional details
Custom parameters
In addition to the coh-custom-effect-name CSS property, you can use the following other properties to pass data to your effect:
coh-custom-effect-float-param-*- a float parameter (maximum 12)- 1-4 are animated
- 4-12 are not animated
coh-custom-effect-string-param-1- a string parametercoh-custom-effect-string-param-2- a string parameter
These properties will be passed to the custom effect directly.
Using those properties requires binding a handler to the ICohtmlPlugin::Get().OnBindCustomEffectParameters delegate. The event will be fired when the custom effect should be drawn and will receive a UMaterialInstanceDynamic object, which will be used to draw the custom effect, and the effect additional parameters (coming from the CSS) along with the effect name.
All you have to do in the handler is bind the additional parameters to the appropriate effect scalar parameters.
Here’s an example handler that sets the FloatParam1 scalar parameter:
void BindAdditionalCustomEffectParameters(UMaterialInstanceDynamic* MaterialInstance, const ICohtmlPlugin::CustomMaterialDrawParams& Params)
{
    const FString Effect1("EffectThatWillBeRenderedWithUE");

    if (Params.Name != Effect1)
    {
        return;
    }

    MaterialInstance->SetScalarParameterValue(TEXT("FloatParam1"), Params.FloatArrayParam[0]);
}

void FMyGameModule::StartupModule()
{
    ICohtmlPlugin::Get().OnBindCustomEffectParameters.BindStatic(&BindAdditionalCustomEffectParameters);
}
You can refer to the Material shown in the very beginning of this chapter as a compatible one for this specific handler (i.e. FloatParam1 exists as a scalar parameter).
UE Integration
Custom effects are implemented in the RenoirCustomEffectRenderer.cpp file and the FCohCustomMaterialDrawer class defined there. This default implementation saves the user from lots of boilerplate code and allows for the possibility to simply assign a Material (that satisfies some requirements listed in the next section) to the HTML element.
Rendering the custom effect is done with a custom Material shader, CohCustomMaterialShaders.usf, that can be found at GameOrEngineDir/Plugins/Runtime/Coherent/CoherentRenderingPlugin/Shaders/Private.
Currently, the Vertex shader part is not configurable and simply draws a transformed rectangle at the correct position for the element.
The Pixel shader is where you could apply the custom effects. You will receive an input texture with the unaltered HTML element which you can use. The end result will be sent back to Prysm as if it were a standard CSS effect.
Mapping effect name to UMaterial
When using the coh-custom-effect-name CSS property, the UE system will eventually receive the string name of the effect. This effect will need to be mapped to a UMaterial. This is done through the OnMapMaterialName delegate in the ICohtmlPlugin module instance.
The steps for adding a handler are the following:
- Bind a handler to the
ICohtmlPlugin::Get().OnMapMaterialNamedelegate - The delegate will be invoked when a custom effect is being rendered
- The name of the effect is provided to the handler (as
const FString&) - Based on the effect name, the handler must return a
UMaterial*that will be used for drawing
- The name of the effect is provided to the handler (as
A complete implementation may go like this:
UMaterial* FMyGameModule::GetMaterialFromName(const FString& EffectName)
{
    check(CustomMaterialMapper);
    return CustomMaterialMapper->GetMaterialForEffect(EffectName);
}

void FMyGameModule::StartupModule()
{
    CustomMaterialMapper = MakeUnique<FCustomMaterialNameToUMaterialMapper>();
    CustomMaterialMapper->Init();
    ICohtmlPlugin::Get().OnMapMaterialName.BindRaw(this, &FMyGameModule::GetMaterialFromName);
}
class FCustomMaterialNameToUMaterialMapper
{
public:
    static const uint32_t NumMaterials = 2;
    static const FString MaterialNames[NumMaterials];
    static const FString MaterialPaths[NumMaterials];

    FCustomMaterialNameToUMaterialMapper()
    {
        for (uint32_t i = 0; i < NumMaterials; i++)
        {
            CustomMaterialClasses[i] = nullptr;
        }
    }

    void Init()
    {
        for (uint32_t i = 0; i < NumMaterials; i++)
        {
            FStringAssetReference CustomMaterialReference(MaterialPaths[i]);
            CustomMaterialClasses[i] = Cast<UMaterial>(CustomMaterialReference.TryLoad());
            check(CustomMaterialClasses[i]);
            CustomMaterialClasses[i]->AddToRoot();
        }
    }

    virtual ~FCustomMaterialNameToUMaterialMapper()
    {
        for (uint32_t i = 0; i < NumMaterials; i++)
        {
            if (CustomMaterialClasses[i])
            {
                CustomMaterialClasses[i]->RemoveFromRoot();
                CustomMaterialClasses[i] = nullptr;
            }
        }
    }

    UMaterial* GetMaterialForEffect(const FString& EffectName)
    {
        for (uint32_t i = 0; i < NumMaterials; i++)
        {
            if (EffectName.Compare(MaterialNames[i]) == 0)
            {
                return CustomMaterialClasses[i];
            }
        }

        return nullptr;
    }

private:
    UMaterial* CustomMaterialClasses[NumMaterials];
};

const FString FCustomMaterialNameToUMaterialMapper::MaterialNames[FCustomMaterialNameToUMaterialMapper::NumMaterials] = {
    FString("topeffect"),
    FString("bottomeffect"),
};
const FString FCustomMaterialNameToUMaterialMapper::MaterialPaths[FCustomMaterialNameToUMaterialMapper::NumMaterials] = {
    FString("Material'/Game/MapAssets/CustomEffect/CohCustomFX_Mat1.CohCustomFX_Mat1'"),
    FString("Material'/Game/MapAssets/CustomEffect/CohCustomFX_Mat2.CohCustomFX_Mat2'"),
};
Creating your own Material
Settings & naming the Material
There are 2 requirements for a Material to be eligible for use with the custom effects feature:
- The name of the Material used must start with CohCustomFX_
- The domain of the Material must be UI
Required fields
The Material must have the following parameter so it can be set by the integration:
CohCustomEffectTexParam: TextureObjectParameter / TextureSampleParameter2D
The Texture parameter will be set to the input Texture that will need to be sampled.
Input fields
The Material shader is provided with 2 sets of coordinates:
TexCoord[0]contains the UVs that need to be sampled from the input texture, e.g. they won’t be [0,0]-[1,1] if the input texture is an atlas and only portion of it is neededTexCoord[1]contains the unmodified UVs of the rectangle that the Vertex Shader outputTexCoord[2]contains the scale needed to adjust the unmodified UVsTexCoord[3]contains the offset needed to adjust the unmodified UVs
TexCoord[0] is what you will almost always use. TexCoord[1]-[3] are used when you want to achieve some specific effect, for example wrapping the texture sampling.Sample effect that changes the saturation of the element
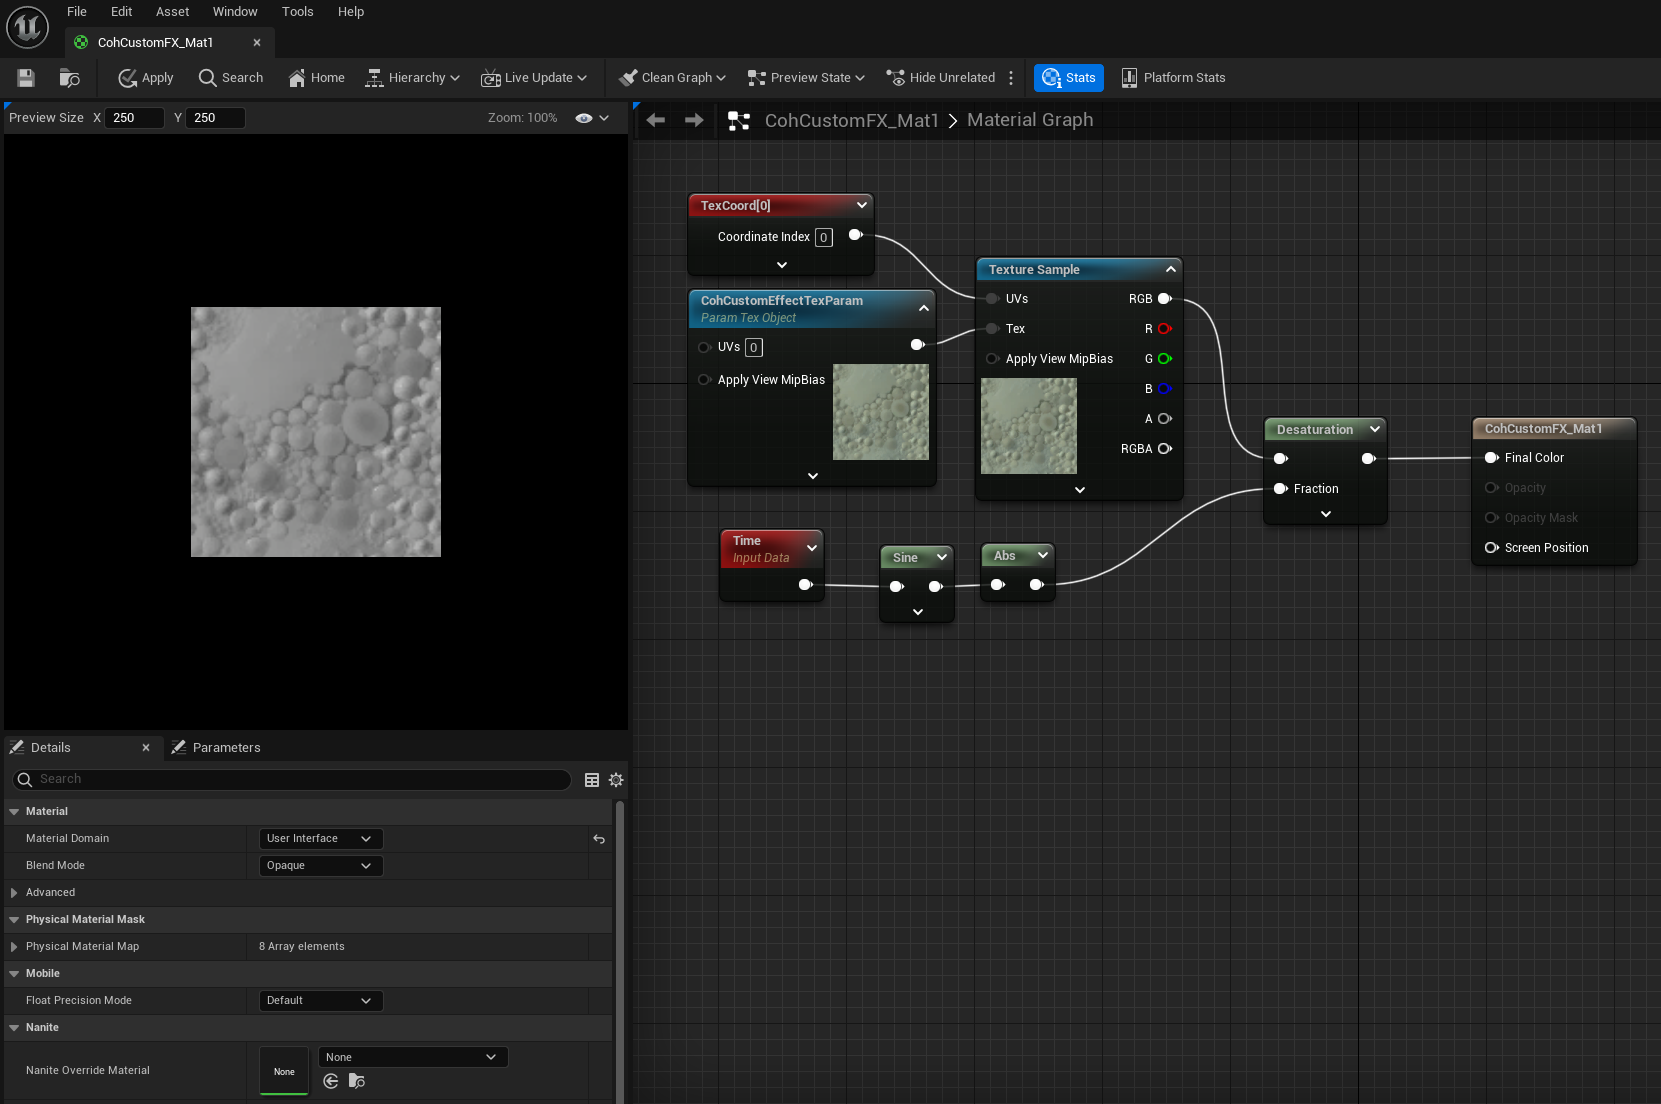
CohCustomFX_Mat1 Material under Content/MapAssets/CustomEffect.Redrawing the custom effect
You may have an effect that depends on a variable that is unknown to the Prysm SDK, e.g. game time. In case the HTML element that has custom effect rendering enabled doesn’t need to be redrawn, i.e. there’s no animation that the SDK knows about, the Material won’t be updated, even though your external variable (e.g. game time) has changed.
The solution to this issue is to simply force the redrawing of the element, using CSS. This can be done by adding an infinite animation to one of the custom parameter properties like so:
#myCustomElement {
    coh-custom-effect-name: amazing-effect;
    animation: forceRedraw 1s infinite;
}

@keyframes forceRedraw {
    from {
        coh-custom-effect-float-param-1: 0;
    }
    to {
        coh-custom-effect-float-param-1: 1;
    }
}
Texture pooling
The Custom Effects feature implements a mechanism to re-use render targets from a texture pool in order to avoid constant texture re-creation and eventually strain on Unreal Engine’s garbage collection. Whenever a custom effect is destroyed, its texture will be cached in a texture pool and then reused when a new effect is created. If the texture cache pool limit is reached, newly released textures will be discarded, allowing Unreal Engine to garbage collect them during the next GC cycle.
To control the behavior of the texture pool accordingly to your use case, we’ve provided the following APIs:
FCohCustomMaterialDrawer::FreeTexturePool()- Frees the custom effect textures currently in the texture pool. Please note that textures which are still being used for drawing an effect will be returned to the pool. If you want to discard these as well, call theSetTexturePoolMaxSizemethod after this one.Once you’ve freed the texture pool, it’s memory footprint will be fully freed once Unreal Engine runs a GC cycle.FCohCustomMaterialDrawer::SetTexturePoolMaxSize(const uint32_t , bool bReserveSize)- Sets the maximum amount of textures that can stay in the pool. ThebReserveSizeflag allows you to reserve theTArraysize in advance.FCohCustomMaterialDrawer::GetTexturePoolCount()- Returns the amount of textures available in the pool.
Using an Unreal Material with Additive Blend Mode
Prysm supports using your Custom Effect Material with the Additive Blend Mode:

However, there is a limitation that needs to be taken into account - if the HTML element which contains your custom effect has a parent element that has a CSS property defined which requires an additional layer, the blending with the rest of the scene will appear incorrect.
List of CSS properties that can cause such an issue:
opacitymix-blend-modemask-imageisolation: isolatebackdrop-filter- Composited element
- Other Custom Effect
Here is how that would look in a minimal frontend code example:
<html>
<head>
<style>
  .effect {
    margin-top: 200px;
    margin-left: 500px;
    position: absolute;
    background-size: 70%:
    background-position: 50% 50%;
    background-repeat: no-repeat;
    height: 500px;
    width: 500px;
    coh-custom_effect-name: myEffect; /* This will cause an additional layer texture to be created */
  }

  .container {
    opacity: 0.5; /* This will cause an additional layer texture to be created */
  }
</style>
</head>
<body>
  <div class="container">
    <div class="effect">My Effect</div>
  </div>
</body>
</html>
And here is how the incorrect scene blending will appear:

An alternative would be to use a Transluscent Blend Mode, but that yields darker results when combined with opacity:

Technical details
In the above example this occurs because Prysm will create two different texture “layers” - one for the opacity and one for the custom effect. If the custom effect is the “top layer”, like so:
  <div class="effect">
    <div class="container"></div>
  </div>
we will directly sample from the custom effect texture, and since there is nothing else “above” it with some sort of transparency, we will be drawing on the UI texture itself, behind which will be the scene buffer from which we can sample and blend the screen space data with the custom effect texture.
In the problematic scenario, however, there will be two textures created - one for the custom effect and one for the opacity. Since the element with the opacity is the parent, it will get drawn first and then drawn on the screen. After which the custom effect texture will be drawn, but when it’s time to be drawn on the screen, the element with the opacity will have already been drawn, so the thing that is sampled behind this texture won’t correspond to the scene backbuffer, thus incorrect blending results will occur. There is no workaround for this at this moment.