Input Handling
Prysm supports flexible input handling. The input handling gives you the following benefits out of the box:
- Detects all
Viewsunder a given mouse/touch pointer event and picks which one of them should receive the event dynamically. - Tracks the currently focused
Viewand forwards keyboard/gamepad events to it automatically. - Supports mouse, touch, keyboard, and gamepad events.
- Notifies you when none of your
Viewshave handled a given input event so that you can handle it in your game if needed. - Gives you control over multiple properties of your input, including customizing when a
Viewwould receive a given event, focusingViewsmanually, and many more.
In regards to input handling, it is usually important to detect whether an event was targeting your UI or your game. For example, when receiving a “spacebar” event - does that mean that the user wants to make their character jump, or insert an interval in an input field? Prysm detects whether an event is targeting your UI or your game automatically and notifies you when it is not handled. This means that as long as you execute your game code using Prysm’s OnEventTargetNotFound callbacks, you can always ensure that the event was targeting your game, and not your UI. Check out the Unhandled Events section for more information.
The Prysm integration in Unity manages input events and sends them to the UI automatically.
During the handling of the event, Prysm will:
- Execute script handlers on the elements.
- Bubble the event upwards as per the HTML standard.
- Call default handlers on elements. Default handlers include scrollingelements and the following touched links.
Input Manager and Input System
Prysm supports both input handling methods – Input Manager, as well as the newer Input System, introduced in Unity 2019.1 You can install the Input system as a plugin from the Unity Plugin Manager.
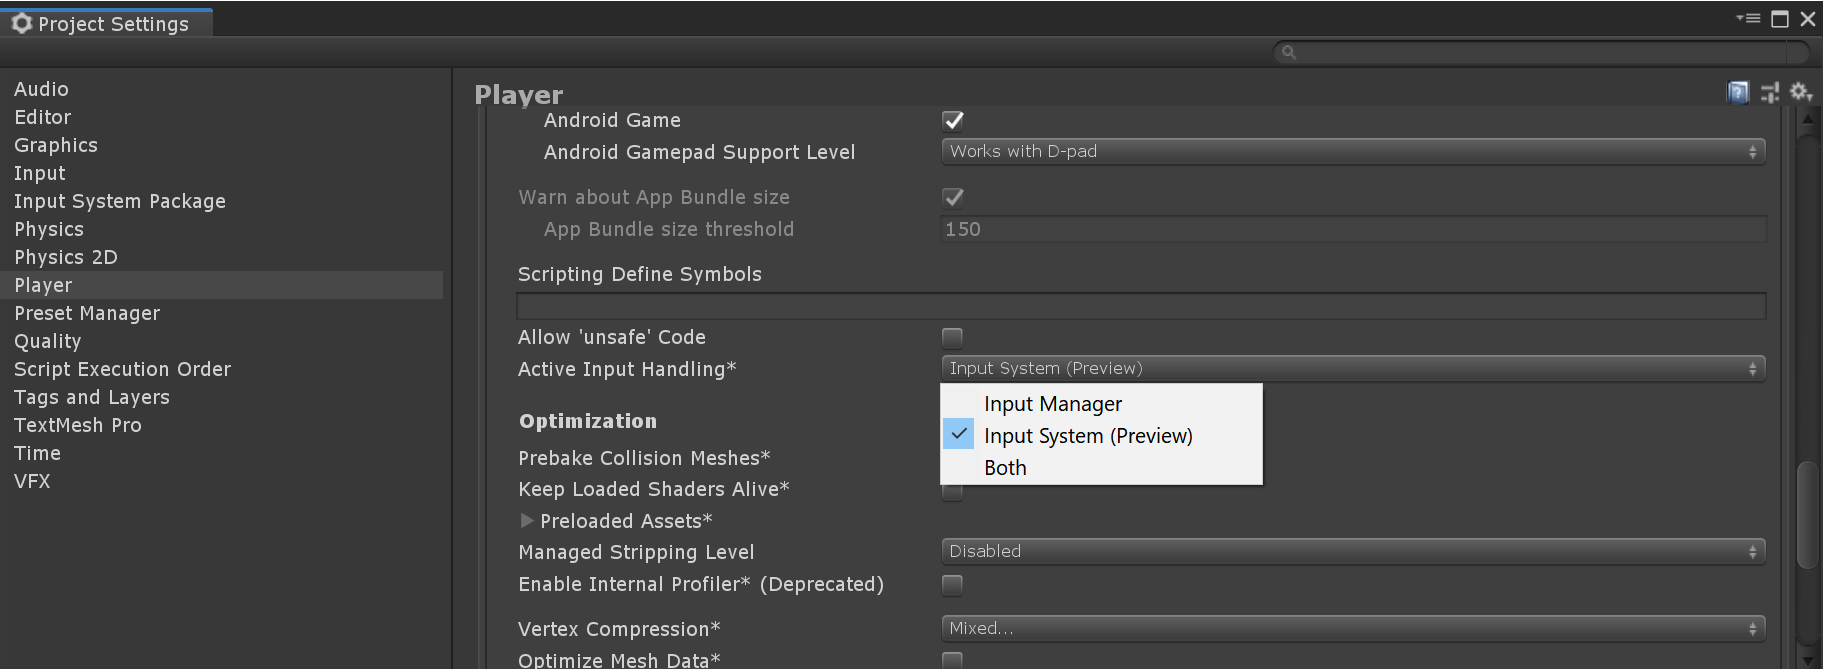
Switching between Input Manager and Input System
To switch between Input manager and Input system, navigate to the Player tab under the Projects menu. Scroll down to Active Input Handling, and select one of the following options:
- Input Manager – the input handling Unity uses by default;
- Input System – the new input handling introduced by Unity 2019.1;
- Both – when both Input Manager and Input System are active, Prysm uses only Input System;
Prysm does not require any additional steps and will automatically detect the active. input handling. Once a new option has been selected, you will be prompted to restart Unity.
Input Handler component
CohtmlInputHandler is a singleton mandatory component to receive working input. If there is no CohtmlInputHandler on the scene the Prysm integration will spawn a default instance on the DefaultCohtmlUISystem game object. You can change the default behavior of the Prysm Input handling by manipulating the CohtmlInputHandler component on the scene manually through your code and changing its properties.
The CohtmlInputHandler has the following properties:
Enable Mouse - When enabled, the Prysm integration will send mouse events automatically. Turn this off if you do not want any of your
Viewsto receive mouse events, or if you are writing customViewmouse handling for your product. Cannot be changed at runtime.Enable Keyboard - When enabled, the Prysm integration will send keyboard events automatically. Turn this off if you do not want any of your
Viewsto receive keyboard events, or if you are writing customViewkeyboard handling for your product. Cannot be changed at runtime.Enable Touch - When enabled, the Prysm integration will send touch events automatically. Turn this off if you do not want any of your
Viewsto receive touch events, or if you are writing customViewtouch handling for your product. Cannot be changed at runtime.Enable Gamepad - When enabled, the Prysm integration will send events from one or multiple gamepads automatically. Turn this off if you do not want any of your
Viewsto receive gamepad events, or if you are writing customViewgamepad handling for your product. Cannot be changed at runtime.Enable Auto Focus - The
CohtmlInputHandlerautomatically manages focus between Prysm Views with enabledRaycastTargetproperty. See more information in the Input propagation section. This property can be changed at runtime.Enable Focus On Pointer Move - Enable the input handler to focus views on the pointer move event. This property was ignored when disabling “EnableAutoFocus”. Can be changed at runtime."
Scroll Pixels - Determine how many pixels will scroll with one tick of the mouse. A negative number will reverse the direction of scrolling. Can be changed at runtime.
Ignored Input CSS Classes - Array of strings that represent the CSS classes that mark a tag as ignored by the
CohtmlInputHandler. If the CSS class is present in the parent tag, this will prevent input propagation for any child elements as well. The amount and their values can be changed at runtime. The CSS “hidden” class is ignored by default.Raycast Camera - The camera is used to handle input events through physics raycasting, started by the mouse pointer or touches. By default, this is the Main Camera component. Can be changed at runtime with the RaycastCamera static property.
The CohtmlView component has the following input properties:
- Raycast Target - Determines whether this View receives input.
Keyboard, Mouse, Touches and Gamepad focus
Prysm provides keyboard and gamepad events only when the CohtmlInputHandler has focused a CohtmlView. If the focused View chooses not to handle the event, the OnKeyEventTargetNotFound or OnGamepadEventTargetNotFound delegates will be fired. These events will provide the original event data received from Unity3D as a parameter.
Mouse and Touch events don’t require focus. They are propagated to the component under the cursor until one of the components handles the event. The processing of the CohtmlInputHandler component works as follows:
- Check if the
Enable MouseorEnable Touchproperties of theCohtmlInputHandlercomponent are disabled - if so, the event will be unhandled. - Check if the HUD View will handle the input. By default, this is determined in the following way:
- The event will be unhandled if its target was the
bodyof the page. - The event will be unhandled if its target was an element with an ignored CSS class or any of its children.
- In all other cases, the event will be handled by the top-most child element under the pointer.
- If none of your
viewshandle the current event, Prysm will trigger a callback that will provide you with the event data. This also implicitly provides you with the knowledge that The event was unhandled by the UI -this might happen because the user clicked on an empty part of a view or pressed a keyboard key when none of yourviewswas focused. In any case, events unhandled by the UI were targeting your game world and require some sort of response (i.e. the player shoots/jumps/etc.). - subscribing to the callbacks below is an effective way to safely execute those responses.
- The event will be unhandled if its target was the
Custom AutoFocus
Toggling input focus can be done 2 ways:
- When
EnableAutoFocusis enabled, pointer interactions on a PrysmViewgive focus to the view. If you point back somewhere in the game viewport, the game will take focus, and the callbacks will trigger to let you handle the event through pointer callbacks. - In a more realistic use case, you’d want to be able to change the focus programmatically. You can do that by disabling the
CohtmlInputHandlerAutoFocusproperty and manually assigning theFocusedViewandFocusedSystemproperties or using theFocusViewmethod. TheCohtmlInputHandlerkeeps track of the current focus internally so it can toggle between game and UI at any time.
Unhandled events
If the Prysm cannot handle the current event, it triggers a callback that provides the event data. If you want to propagate the event first from the Prysm UI and passed to the scene gameObjects below after that, you can subscribe to these callbacks and handle the event in your game:
- OnMouseEventTargetNotFound - This callback provides you with a wrapper of the original Unity3D event. You can retrieve it via the
Eventproperty. It can be of the following types:- When using the Input System, the event will be
ButtonControlorVector2Control. - When using the Input Manager, the event will be
UnityEngine.Event.
- When using the Input System, the event will be
- OnTouchEventTargetNotFound - This callback provides you with a
cohtml.InputSystem.TouchEventCollectionwhich contains all active touches. Every touch is an object which has the following properties:- Id - id of the active touch.
- IsActive - check whether that touch is active in the current event.
- Type - the type of the event. Possible options are
Down Move or Up. - Modifiers - which keyboard key modifiers were held down when the event was produced. The possible tracked buttons are
Shift Ctrl System key Alt CapsLock and Numlock. - Position - Property of type Vector2Int, represents the current touch position.
If these options do not suit your use case, you can use the Unity3D static event classes to represent the input you use e.g. Input System (Touchscreen.current) or input Manager (Input.touches)
- OnKeyEventTargetNotFound - This callback provides you with a wrapper of the original Unity3D event. You can retrieve it via the
Eventproperty. It can be of the following types:- When using the Input System, the event will be
KeyControl. - When using the Input Manager, the event will be
UnityEngine.Event.
- When using the Input System, the event will be
- OnCharEventTargetNotFound - This callback provides you the char pressed. The callback will be received repeatedly until the key is released.
- OnGamepadEventTargetNotFound - This callback provides you the Gamepad event
cohtml.InputSystem.GamepadBase.GamepadMapwhich represent the entire gamepad input, including the buttons and axes.cohtml.InputSystem.GamepadBase.GamepadMaphas the following properties:- Id - id of the gamepad on which buttons are pressed.
- Name - Name of the gamepad layout given from Unity3D.
- Buttons - Array of the gamepad buttons.
- Axes - Array of the gamepad’s axes.
The button and axes layout can be found on the W3C gamepad page.
If these options do not suit your use case, you can use the Unity3D static event classes to represent the input you use e.g. Input System (Gamepad.current) or input Manager (Input.GetAxis)
For further information, you can see the sample scene “Input Propagation” provided in Prysm samples.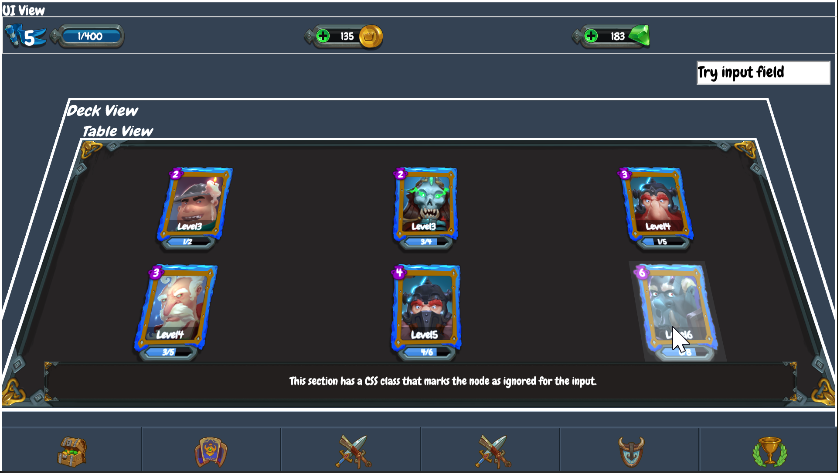
Input on multiple components in the scene
When you have multiple in-world Views and they are overlapping when viewed through the current camera, the front one will receive the pointer input events, and the back one will receive no events. If, for example, you have disabled RaycastTarget on the front one, the back one will handle the event instead. If the first View has enabled RaycastTarget but the event passed it, the event will propagate to the second View.
Input Manager and gamepads
Unity3D’s Input Manager gamepad mapping is an incomplete API that lacks standardization across different gamepad models on various operating systems. Therefore, Prysm has a basic mapping system for the most common gamepad models on supported basic platforms to properly relay gamepad information about pressed buttons or axes to Prysm in the W3C standard.
| Platform | Dualshock 4 | DualSense | Xbox One/360 | Stadia | Generic |
|---|---|---|---|---|---|
| Windows 10/11 | Yes | Yes | Yes | Yes(Wireless No) | Yes |
| MacOS (10,13,14) | Yes | Yes | Yes(v.14 No) | Yes | Yes |
| Linux | Yes | Yes | Yes | Yes | Yes |
| Android | Yes | Yes | Yes(Wired no) | Yes | Yes |
| iOS/iPad | Yes | Yes | Yes(Wired no) | Yes | Yes |
It has also been tested with Nintendo JoyCon controllers, but the Input Manager does not provide accurate axes and button indications without adding additional drivers, hence they are not supported.
If the mapping of the gamepad, which is not among those listed, falls back to a generic gamepad that has minimally supported buttons and axes, which most commonly match in most tested controller mappings. When this happens, an error will be logged to the console. If this generic gamepad mapping is not sufficient for the gamepad’s purposes, you can add your mappings by inheriting the GamepadMapper class and making your implementation. You can also change the behavior of mapped buttons and axes using methods from the GamepadMapper object:
m_ButtonsMapandm_AxesMap- collections to which Unity3D maps buttons and axes to W3C mappings.UpdateEntities- updates the array of buttons and axes based on the mapping. Can be overridden.UpdateButtons- updates the array of buttons based on the mapping. Can be overriddenUpdateDPad- most D-Pad buttons are mapped to 2 axes, but sometimes they are buttons, so proper handling of these buttons is required through this method. Can be overridden.UpdateValue- the method used by all the above methods. Can be overridden.MapButtonandMapAxis- return a button or axis in the correct formatted string, which we expect from the Unity3D Input Manager mapping.- enum
ButtonJSIndexandAxisJSIndex- Buttons and axes displayed in the correct order according to the W3C standard. Each number corresponds to the index in the respective array. - enum
Platform- supported platforms. When a gamepad from another platform is present, it should be added here. The valueUnknownshould always be first, andCountshould always remain last. - enum
Profile- Gamepad profiles that are supported. If there is a new one, it can be added, or you can useOther.
After implementing a custom gamepad, you should add it to the GamepadAliases array in the initializer of the objects located in GamepadInputManager.s_PlatformGamepadsNamesMap under the specific Platform as a key. The GamepadAliases structure contains:
Aliases- an array of strings in lowercase that are the names of the gamepads, as the Input Manager retrieves them from the operating system. The mapping used is selected based on matching these aliases.ReturnType- the type of the returned object, i.e., if your new class is namedGamepadMapLogitechMacWingman, then you should puttypeof(GamepadMapLogitechMacWingman).
The GamepadInputManager.CreateGamepadMapper method takes into account the platform on which the application is running, and based on the name of the gamepad given to the Unity3D Input Manager by the operating system, it selects the correct mapping implementation from the GamepadInputManager.s_PlatformGamepadsNamesMap dictionary collection and creates an instance. To avoid case sensitivity issues with the gamepad name, the names in the array GamepadInputManager.GamepadAliases.Aliases must be written in lowercase.
Runtime/Detail/InputSystem/InputManagerGamepadMapping.Attaching event listeners in JavaScript
Developers can attach event listeners in JS and execute logic depending on the event:
function touchDownHandler()
{
  console.log("myElement touched!");
}

document.getElementById("myElement").addEventListener('touchstart', touchDownHandler, false);
Using event listeners the developer can implement custom logic when a certain element is touched, like implementing a game menu, where touching the “New Game” element will trigger an event in the game that will start the game world.
Sending touch and mouse events to Cohtml
Prysm uses Unity3D’s Input.simulateMouseWithTouches setting to determine whether to send mouse or touch events. This is how the behavior would work depending on the value of the setting and the platform that you’re on:
If
Input.simulateMouseWithTouchesisfalseand you’re on a device that supports touch, then only touch events will be sent to Cohtml. This means that only thetouch*event listeners in your JavaScript code will be executed.In all other cases, only mouse events will be sent to Cohtml. Again, this implies that only the
mouse*listeners in your JavaScript code will be executed.
If you add event listeners for click events, they will work with both mouse and touch, since the touch down / touch up sequence will be treated as a tap gesture and it’s equivalent to a click.
Dispatching events from JavaScript
Prysm supports the standard (yet now deprecated) API for the creation and dispatching of events which lets you simulate input from JS. For example to trigger a mouse click on the body:
var eventX = 250;
var eventY = 300;
var isCtrlDown = true;
var evt = document.createEvent('MouseEvent');
evt.initMouseEvent('click', true, true, /* whether the event can bubble and can be cancelled */,
    null, 0,
    eventX, eventY, eventX, eventY, /* coordinates */
    isCtrlDown, false, false, false, /* key modifiers */
    0 /* button index */, undefined);
document.body.dispatchEvent(evt);
Text selection
Prysm supports text selection in input fields by holding shift and moving the caret with the arrow keys and through the standard Text Control API
Prysm support Cut, Copy and Paste text manipulation out of the box.
Prysm also supports generic text selection through the standard Selection API The implementation is minimal, supporting only setBaseAndExtent, empty and toString. The caretPositionFromPoint function enables getting the character index at certain page coordinates.
In FrontendSamples -> uiresources/HelperScripts/mouseSelection.js you can find an example of a script that allows mouse selection in inputs and generic text.
Using JavaScript the selection capabilities may be extended even further to support Select All or double-clicking to select a word.