Custom Systems
The Gameface integration in Unity3D supports multiple systems with custom settings.
Overview
The Gameface CohtmlUISystem component controls some of the behavior of all cohtml.Net.View objects assigned to it. When creating a scene, Gameface will spawn a CohtmlUISystem component in its game object and every CohtmlView will be connected to it unless otherwise specified. If you want to customize the system-related behavior of your CohtmlViews, you can create your custom CohtmlUISystem component and attach any number of CohtmlViews to them. To achieve this, you need to create a game object and add the CohtmlUISystem and CohtmlSystemSettings components to it. You can control these components through the inspector or via script. The cohtml.Net.SystemSettings directly you can customize are:
- Resource handler
- The directories resources are loaded from
- Localization manager
- TextTransformation manager
- Debugger settings
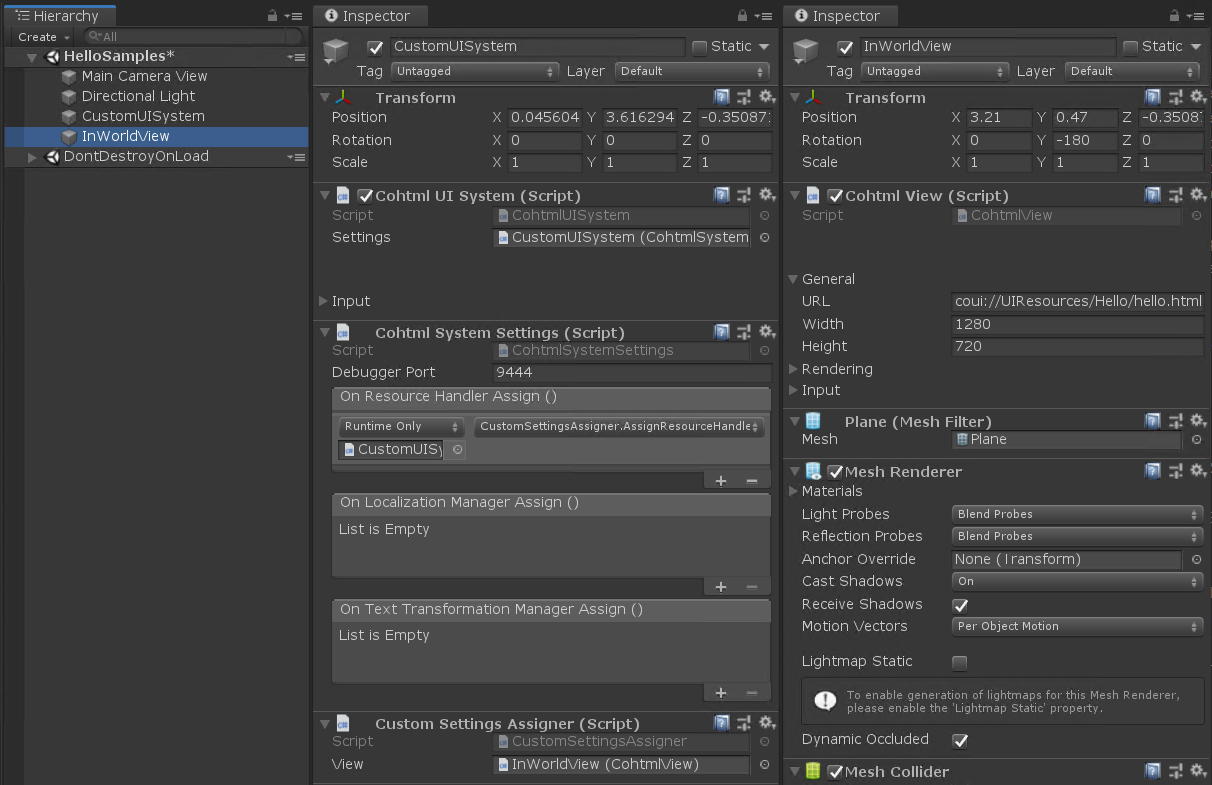
Below you can see what a system with a custom Resource Handler would look like in the Unity3D Editor.
How to use
To set up a system with a custom Resource handler see the example below. You can assign custom Localization manager and TextTransformation manager in the same way.
The general steps needed are:
- Create your custom Resource handler.
- Add a System settings component on any
GameObjectand assign your custom Resource handler to it. - Add a cohtml.Net.UISystem component on any
GameObjectand assign your System settings component to it.
Views before the View.Start() method is called. They cannot be changed afterward.You can do that via the Unity3D editor or via script.
Using Unity3D editor
Add a
CohtmlSystemSettingscomponent to the scene.Create a script with your custom implementation of the cohtml.Net.IAsyncResourceHandler interface. For this example, we will call it
CustomResourceHandler.cs.Create a
MonoBehaviourscript that creates yourCustomResourceHandlerobject and attaches it to the ResourceHandler property of the system settings.public class CustomSettingsAssigner : MonoBehaviour { public void AssignResourceHandler() { CohtmlSystemSettings settings = GetComponent<CohtmlSystemSettings>(); settings.ResourceHandler = new CustomResourceHandler(); } }Attach the
CustomSettingsAssigner.csscript to theCohtmlSystemSettings GameObject.Attach the
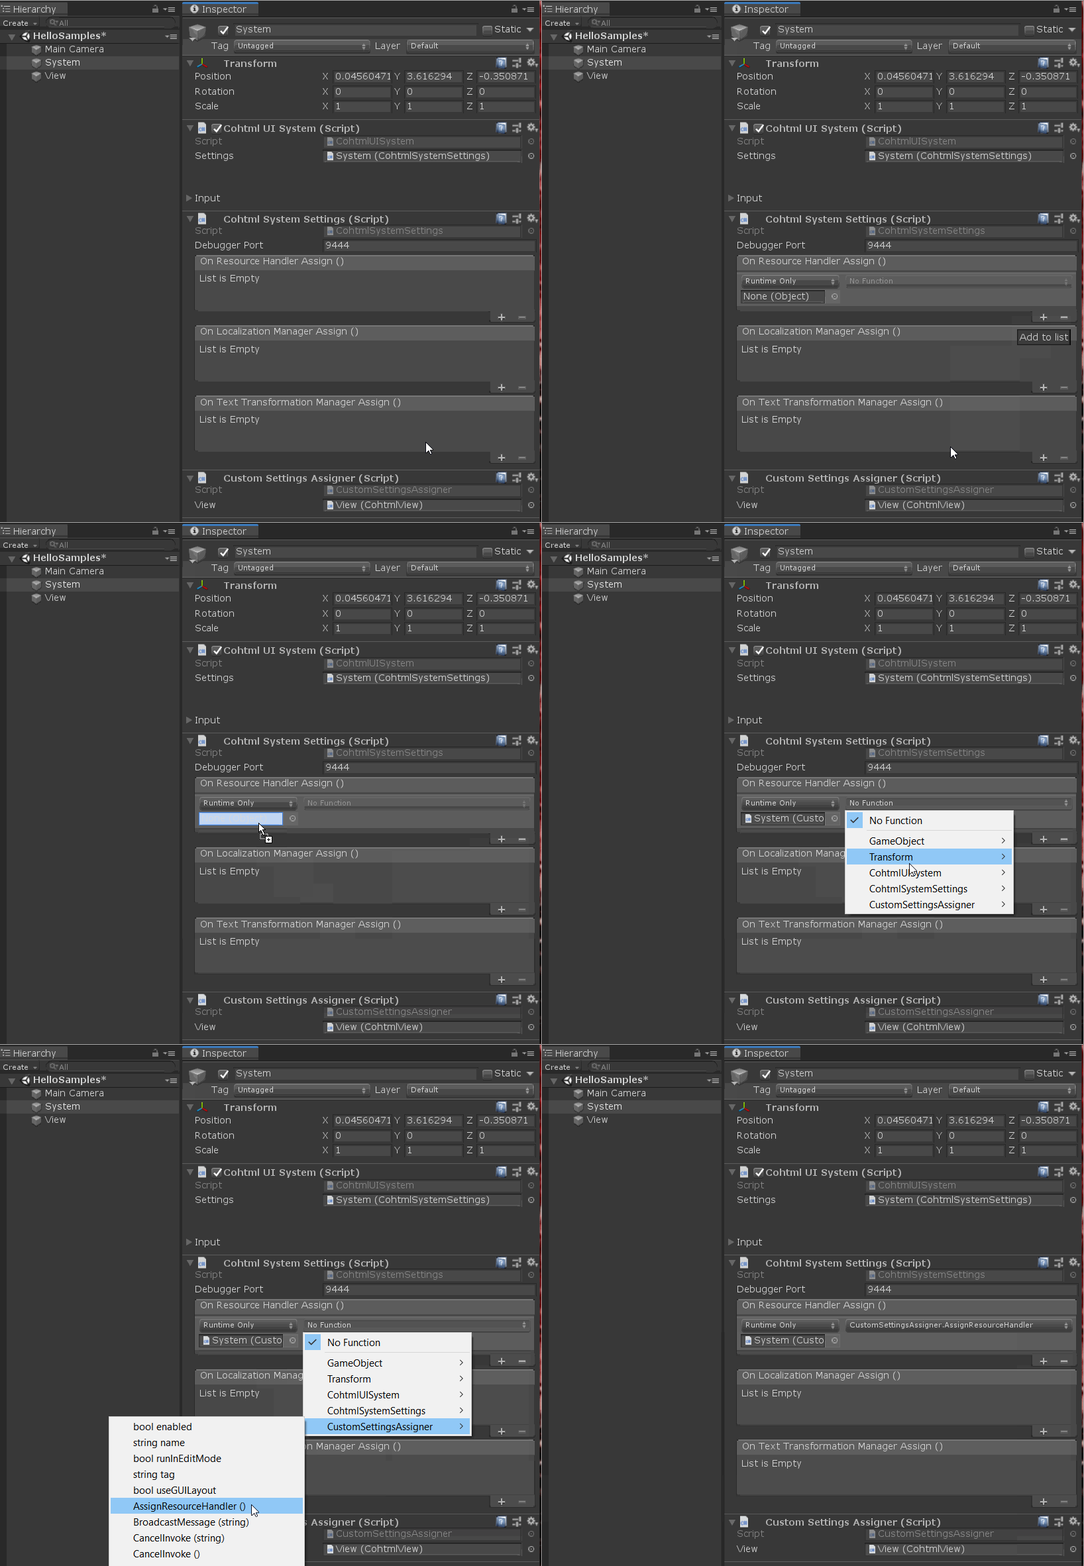
AssignResourceHandler()method to the first event called On Resource Handler Assign.
Now you can create your own
CohtmlUISystemand assign theCohtmlSystemSettingsto its properties.
Using custom component
Create a script with your custom implementation of the cohtml.Net.IAsyncResourceHandler interface.
Create a
MonoBehaviourscript that overrides theUnityEngine.Awake()method. Use it to create aCohtmlSystemSettingscomponent, add your custom Resource Handler to it, then spawn your customCohtmlUISystemusing theCreateNativeUISystem(settings)method.public class CustomSettingsAssigner : MonoBehaviour { public void Awake() { CohtmlSystemSettings settings = gameObject.AddComponent<CohtmlSystemSettings>(); settings.ResourceHandler = new CustomResourceHandler(); CohtmlUISystem system = gameObject.AddComponent<CohtmlUISystem>(); system.CreateNativeUISystem(settings); // NOTE: You can start assigning Views to the CohtmlUISystem here // i.e. MyView.CohtmlUISystem = system; } }Now you can add Views to your custom
CohtmlUISystemby changing theView.CohtmlUISystemproperty.
CohtmlView will automatically refer to it if you skip this step.CohtmlUISystem on the scene and you haven’t referenced the newly created CohtmlView to any of them, the automatic reference will not work because it is not defined which system it should be attached to. In this case, you will receive an error in the console to notify you of the issue.Customizing the CohtmlSystemSettings component
The default behaviors you can override in the SystemSettings from cohtml.Net.SystemSettings are:
Resource handler
The resource handler provides your resources (e.g images, scripts, fonts etc.) to the cohtml.Net.View components. By default, it will load these resources from the UIResources folder or fetch them from the web.
Default Behavior
The UI resources folder in the project is the place from where Gameface loads your pages. When a CohtmlView loads any URL it would try to replace the coui://[host] part of the URL with a specified location until it finds the resource.
By default the only location searched this way will be Assets/StreamingAssets/Cohtml/UIResources. Gameface uses the StreamingAssets folder because it is a special Unity3D location for content that is intended to be included in the built project and can be accessed on all platforms.
For example, when loading the URL coui://UIResources/MyFirstUI/my-page.html, Gameface will search for that file in Assets/StreamingAssets/Cohtml/UIResources/MyFirstUI/my-page.html
Overriding Behaviour
- You can provide additional locations to be searched for resources inside your project. That functionality comes in handy when you want to store your resources inside other special locations like Application.PersistentDataPath, Application.StreamingAssets or other UI Resources locations inside your project.
- Gameface keeps a list of Host locations, such as preloaded user images. Every Host holds a list of locations where its resources are stored in. When searching for a resource Gameface will try all locations for the selected host until it is found. If the resource is not found in any of the host’s locations Gameface will show an error message.
- You can override the default behavior by overriding the HostLocationsMap property.
- Host preloaded is reserved for preloaded user textures.
Replace resource locations
The general steps needed are:
For the purpose of example, create script
ResourceLocationsAssigner.cs, with a method calledAssignResourceLocations(). This method will assign the ResourceHandler’s HostLocationsMap property which holds a Dictionary of hosts to Locations map. The host is the key. Value is the location collection.public class ResourceLocationsAssigner : MonoBehaviour { public void AssignResourceLocations() { CohtmlSystemSettings systemSettings = GetComponent<CohtmlSystemSettings>(); // Create Default or Custom Resource Handler. systemSettings.ResourceHandler = new DefaultResourceHandler(); systemSettings.HostLocationsMap = new Dictionary<string, List<string>> { // Example how to use Default host and locations. That initialization is not mandatory. { DefaultResourceHandler.DefaultHostLocations.Key, DefaultResourceHandler.DefaultHostLocations.Value }, {"persistent", new List<string> {Application.persistentDataPath}}, // Example how to use your custom hosts with collection of locations. {"mylocation", new List<string> { Application.streamingAssetsPath + "/DownloadedPatch", Application.streamingAssetsPath + "/MyLocation" }} }; } }Add an empty GameObject to the Unity3D scene.
Add
CohtmlUISystemcomponent to the created GameObject.Add
CohtmlSystemSettingsto the created GameObject.Add
ResourceLocationsAssigner.csto the created GameObject.Assign your custom Additional Resource Locations to
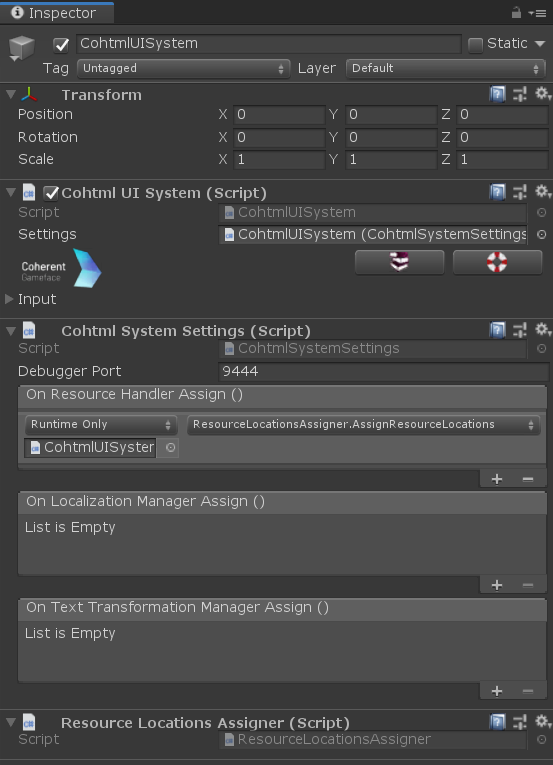
CohtmlSystemSettingscomponent via On Resource Handler Assign.

Localization manager
The Localization manager is used to dynamically translate your User Interface. There is no default Localization manager implementation.
TextTransformation manager
Gameface supports the text-transform CSS property that allows automatic uppercase/lowercase/capitalize transformations of text. There is no default TextTransformation manager implementation, so you need to implement your own.
Debugger settings
You can use the Debugger settings to enable or disable the DevTools Inspector and change its port and enable or disable the Devtools inspector in a built game.
Tips and best practices
- The
CohtmlView.AddMissingWorldViewComponentsmethod adds additional components through Unity3D engine utilities. Adding components at runtime involves extra processing and may lead to increased overhead and inefficiencies compared to pre-configuring these components in advance at runtime. Therefore, you can create your Views and components in advance through the editor. Or ultimately, use a Unity3D prefab, prepared with all the components for the in-worldCohtmlView, and instantiate it in the scene. For example:
public GameObject inWorldViewPrefab;
...
CohtmlView cohtmlViewComponent = Instantiate(inWorldViewPrefab).GetComponent<CohtmlView>();
- It is not necessary to create a
CohtmlSystemSettings component for everySystemyou have on the scene. Gameface will assign a default settings component for every system component. Do it only when you want to add a custom implementation. - It is not necessary to create
CohtmlUISystemcomponents for everyCohtmlViewinstance. You can have multipleCohtmlViewsusing your custom system at the same time. Having multiple instances ofCohtmlUISystemandCohtmlSystemSettingson the sameGameObjectis not allowed.You can have a maximum of 16 systems alive at the same time.If you want to have only one system on the scene with default system settings do not create your own system. Gameface will create a UI system and will take care of your CohtmlViews automatically.