

Custom Effects
Gameface since version 1.9.5 supports a few new custom properties, allowing for passing custom data for embedding user effects that are otherwise not possible with standard CSS methods.
These new properties are:
coh-custom-effect-namecoh-custom-effect-float-param-*- 1-4 are Animatable
- 5-16 are not Animatable
coh-custom-effect-string-param-1coh-custom-effect-string-param-2
Adding coh-custom-effect-name property will automatically trigger an alternative code flow and emit renoir::DrawCustomEffectCmd commands that should be handled by the backend. The client can set custom vertex/pixel shaders that achieve some custom effect.
struct VS_INPUT{ float4 Position : POSITION; float4 Color : TEXCOORD0; float4 Additional : TEXCOORD1; // .xy = texture coordinates};The renoir::DrawCustomEffectCmd has the following information:
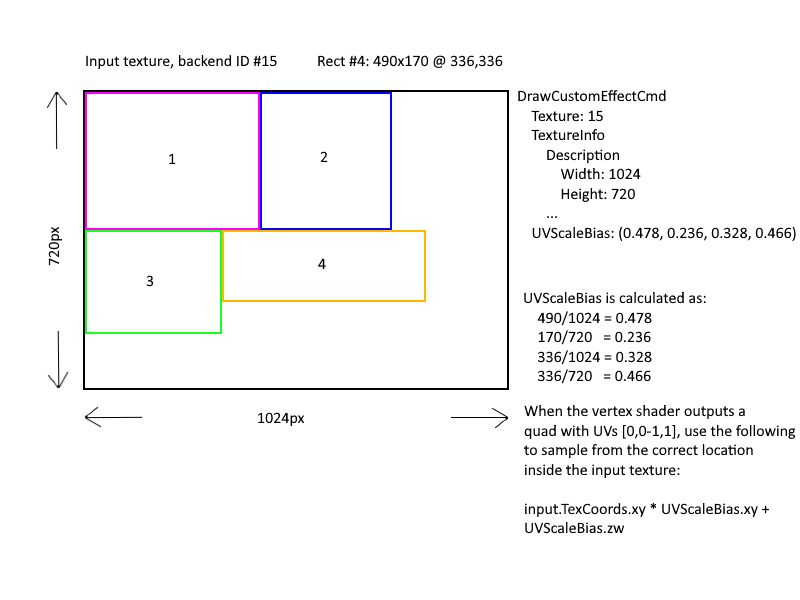
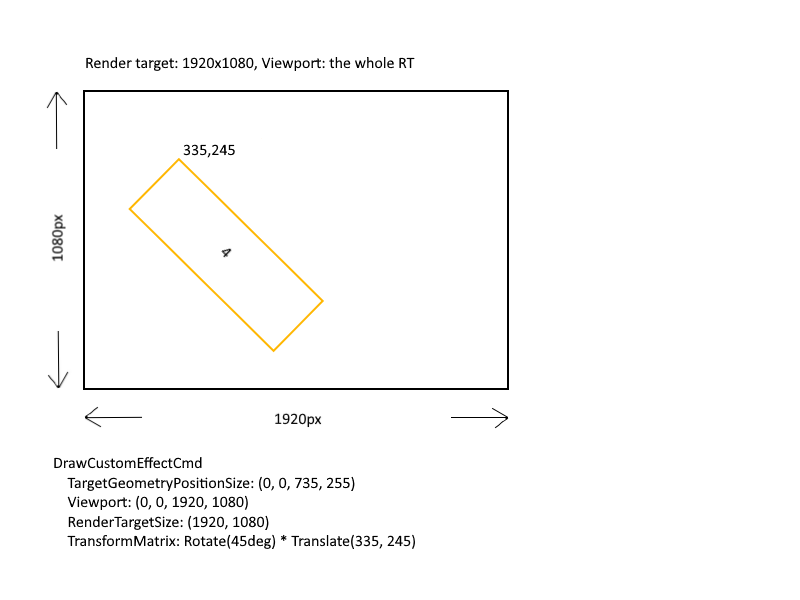
Texture2DObject Texture: the backend texture ID to be used as a source for samplingTexture2D TextureInfo: information aboutTexture, e.g. dimensions.float4 UVScaleBias: The custom effect is always drawn as a quad with UVs [0,0-1,1] at the corners. This field describes the required scale (.xy) and offset (.zw) in the texture so the sampling is correct, in case the input texture is part of an atlas, for example. Basically, in that case, the sampled location should beinput.Additional.xy * UVScaleBias.xy + UVScaleBias.zwif using custom geometry. If not, the SDK would have preset the proper coordinates for the vertices in the bound vertex buffer and you can directly useinput.Additional.xy. The scale and bias may then be used for computing effect parameters derived from the size of the sampled area, as it is done in theSampleCustomEffectssample.float4 TargetGeometryPositionSize: Position (.xy) and size (.zw) in the render target, in pixels.float4 Viewport: Currently set the viewport for the render target.float2 RenderTargetSize: Size of the render target.unaligned_float4x4 TransformMatrix: Transformation matrix of the quad.void* UserData: Arbitrary user data set with thecohtml::View::SetSceneCustomEffectRendererAPI.UserEffect Effect: Structure hosting the custom float and string parameters, that were passed through thecoh-custom-effect-<TYPE>-param-<N>CSS properties.
Here’s an example of what the DrawCustomEffectCmd structure might contain:
#elementWithCustomEffect { coh-custom-effect-name: MyEffect; animation: forceRedraw 1s infinite;}@keyframes forceRedraw { from { coh-custom-effect-float-param-4: 0; } to { coh-custom-effect-float-param-4: 1; }}This consumes a slot for a float parameter but solves the issue with the repaint, although it does force the element to be redrawn every frame. A similar solution is to simply set the corresponding JavaScript, i.e. elementWithCustomEffect.style.cohCustomEffectFloatParam4 = <some value different than before>;.
Threading
Section titled “Threading”The renoir::ICustomEffectRenderer::OnRenderCustomEffect callback can be configured to be called on the Layout thread, controlled by the ViewSettings::ExecuteCommandProcessingWithLayout option. If set to true, the renoir::ICustomEffectRenderer::OnRenderCustomEffect for that view will be executed on the Layout thread. This can be useful for offloading custom effects processing to the Layout thread, freeing up the Render thread to do other work.
Effects with multiple passes
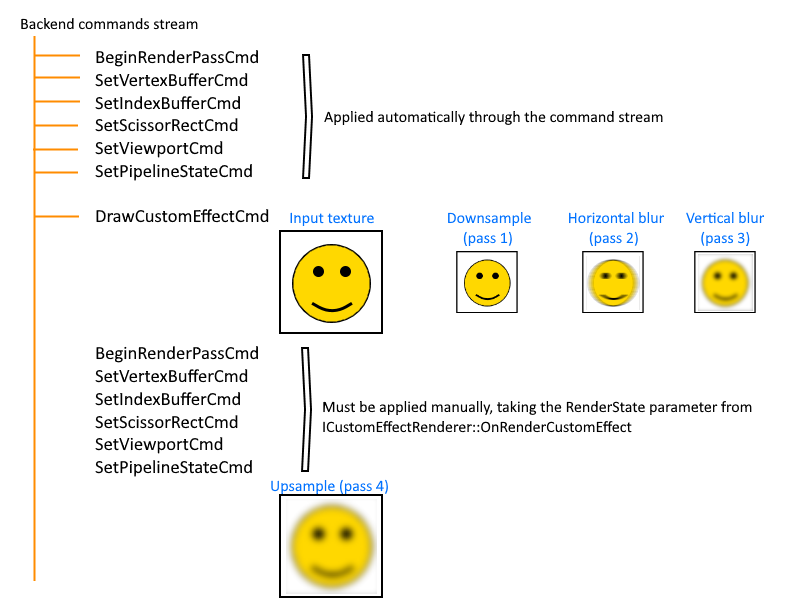
Section titled “Effects with multiple passes”Gameface sets up the graphics state before issuing the DrawCustomEffectCmd command so that the graphics API is ready for drawing a rectangular geometry in the correct render target. The client only has to bind a custom Pixel shader, bind the passed texture on input and issue a Draw call.
If you’re doing a more complex effect, such as a blur of some kind, you’ll want to change the render target, and some other graphics states, such as the scissor, viewport, etc. After, those changes, you’ll have to set the whole state back to what Gameface expects so the result is in the correct texture. That’s what the ICustomEffectRenderer::RenderState parameter in the renoir::ICustomEffectRenderer::OnRenderCustomEffect callback is used for. It contains all the state commands that need to be applied to restore the graphics state back to what it was before the DrawCustomEffectCmd. The parameters are in the form of backend commands as those will usually be processed by the backend, which already has the means for doing so. You need to apply that state before the last pass of your effect.
Here’s a diagram that illustrates what and when is set up:
Putting it all together
Section titled “Putting it all together”Let’s take the following example:
- There are multiple Gameface Views in the system
- Only one of them applies custom effects
- The custom effect will apply a simple component-wise color multiplication based on the custom parameters in the CSS
We’ll use this simple HTML page that displays an image and animates the custom effect parameters
<html><head><style>body {    background-color: white;}
#customEffect {    position: absolute;    left: 100px;    top: 100px;    width: 100px;    height: 100px;    coh-custom-effect-name: TheOnlyEffectThatShouldBeRendered;    background-image: url('icon.png');    animation: pulse 2s infinite;}
@keyframes pulse {    from {        coh-custom-effect-float-param-1: 0;        coh-custom-effect-float-param-2: 1;        coh-custom-effect-float-param-3: 0.4;    }    to {        coh-custom-effect-float-param-1: 1;        coh-custom-effect-float-param-2: 0;        coh-custom-effect-float-param-3: 0.9;    }}
</style></head><body>
<div id="customEffect"></div>
</body>
</html>
Here’s the final result, which is completely driven by the CSS code:

In the code, we’ll have to set up an object that is associated with the View that renders the custom effects. That’s because the rendering backend is shared for all Views and we’ll need to identify the View in some manner.
We’ll create a simple class that allows the rendering of the custom effect if it’s called “TheOnlyEffectThatShouldBeRendered”.
class CustomEffectHandler : public renoir::ICustomEffectRenderer{public:    bool ShouldRenderEffect(const DrawCustomEffectCmd* command)    {        if (strcmp(command->Effect.Name, "TheOnlyEffectThatShouldBeRendered") == 0)        {            return true;        }        return false;    }
    virtual void OnRenderCustomEffect(const DrawCustomEffectCmd& command, const RenderState& targetState) override    {        // In the simple case where the SDK is configured to execute        // command batching on the render thread, nothing is needed here.    }};
// Some class that stores a persistent variable for the CustomEffectHandler instance// and the CoHTML Viewstd::unique_ptr<CustomEffectHandler> m_CustomEffectHandler;... initialize m_CustomEffectHandler ...cohtml::View* m_View;// After creating the View...// We won't use the ICustomEffectRenderer now, so we can pass null there,// only user data.// In this case CustomEffectHandler doesn't need to inherit from the// ICustomEffectRenderer interface but we do it for completenessm_View->SetSceneCustomEffectRenderer(nullptr, m_CustomEffectHandler.get());We’ll take the D3D11 backend as an example for handling the DrawCustomEffectCmd
This is the shader that we’re going to use:
// This shader is basically a copy of CohStandardPS.hlsl// The input texture we need to sample from is bound on "txBuffer"// The CSS float parameters are bound on "PrimProps0"// Check the CohCommonPS.ihlsl file for the definition of those variables.
#include "CohPlatform.ihlsl"#include "CohStandardCommon.ihlsl"#include "CohCommonPS.ihlsl"#include "CohShadeGeometry.ihlsl"
float4 CustomEffect(PS_INPUT input) : SV_Target{    float alpha = 1.0;    float4 outColor = input.Color;
    outColor = SAMPLE2D(txBuffer, input.Additional.xy);    outColor.rgb = saturate(outColor.rgb * PrimProps0.rgb);
    alpha = input.Color.a * saturate(input.Additional.z);
    return outColor * alpha;}
We’ll assume that shader was set up in the backend and can be accessed through the m_CustomEffectShader variable.
void Dx11Backend::DrawCustomEffect(const DrawCustomEffectCmd* command){    CustomEffectHandler* effectHandler = (CustomEffectHandler*)command->UserData;    // Note that the backend is global for all Views. In case you need to employ    // some custom per-view logic, it's advised to have a reference to the View    // in the user data structure (CustomEffectHandler in this case)    if (!effectHandler || !effectHandler->ShouldRenderEffect(command))    {        return;    }
    // Set up topology    if (m_CurrentTopology != command->Topology)    {        switch (command->Topology)        {        case PTO_TriangleList:            m_ImmediateContext->IASetPrimitiveTopology(D3D_PRIMITIVE_TOPOLOGY_TRIANGLELIST);            break;        default:            assert(false);            std::cerr << "Unknown primitive topology!" << std::endl;            break;        }
        m_CurrentTopology = command->Topology;    }
    // Set up the custom pixel shader you have    m_ImmediateContext->PSSetShader(m_CustomEffectShader.Get(), nullptr, 0);
    // Find the texture that needs to be bound on input (command->Texture)    {        ID3D11ShaderResourceView* srv = nullptr;        auto texId = command->Texture;
        const auto& tex = m_Textures.find(texId);        if (tex != m_Textures.cend()) // likely        {            srv = tex->second.SRV.Get();        }        else        {            // Try to find the texture in the user render targets            auto rt = std::find_if(m_RTs.begin(), m_RTs.end(), [texId](const RTImpl& p)                {                    return p.first == texId;                });            if (rt != m_RTs.cend())            {                assert(!m_BackBufferSRV.Get());                m_BackBufferSRV.Set(CreateSRVFromRTV(m_Device, rt->second.RTDescription, rt->second.RTV));                srv = m_BackBufferSRV.Get();            }            else            {                assert(false);                std::cerr << "Unable to find texture!" << std::endl;                return;            }        }        m_ImmediateContext->PSSetShaderResources(0, 1, &srv);    }
    // Update the constant buffer with the variables    // Note that getting the targetBufferId this way is not recommended, this works only    // in the case where the backend has a constant buffer ring size of 1!    // It's usually better to create and bind your own constant buffer.    // Use the SampleCustomEffects for reference.    renoir::ObjectId targetBufferId = CB_StandardPrimitiveAdditionalPixel;    auto cbIt = std::find_if(m_ConstantBuffers.begin(), m_ConstantBuffers.end(),        [targetBufferId](const ConstantBufferPair& cbp) {            return cbp.first.Id == targetBufferId;        });    assert(cbIt != m_ConstantBuffers.end());
    struct PrimPropsUpdate    {        renoir::float4 PrimProps0;        renoir::float4 PrimProps1;    } update;    update.PrimProps0 = float4(command->Effect.Params[0], command->Effect.Params[1], command->Effect.Params[2], command->Effect.Params[3]);    m_ImmediateContext->UpdateSubresource(cbIt->second.Get(), 0, nullptr, &update, 0, 0);
    // Draw!    m_ImmediateContext->DrawIndexed(command->IndexCount, command->StartIndex, command->BaseVertex);}
Sample
Section titled “Sample”You can find a complete sample demonstrating the usage of custom effects in the Samples directory of the SDK named SampleCustomEffects. Currently, the sample only works under Windows and uses D3D11. The sample shows a configurable twirl effect.
Here’s a quick rundown of what happens there:
- First, we should note that the sample doesn’t use the
cohtml::View::SetSceneCustomEffectRendererAPI for setting a custom renderer and/or user data. The sample would use theDrawCustomEffectCmddata directly on the render thread so we don’t need a custom renderer and we only have 1 view and 1 effect so we don’t need custom data either. Usually, custom data would contain theViewobject for the effect so that we can employ custom logic there (as theRendererBackendis global for all views). - A custom backend is created. It needs to handle the processing of the
BC_DrawCustomEffectcommand in theExecuteRenderingvirtual method. The D3D11 backend conveniently exposes another virtual function that is invoked automatically when processing the command -virtual void DrawCustomEffect(const DrawCustomEffectCmd* command). - When initializing the backend, some resources needed for the twirl effect are created
- A custom Vertex Shader (see the
VS_INPUTstructure at the beginning of the chapter for the vertex layout) - A custom Pixel Shader
- Constant buffer for the VS
- We use the already bound vertex buffer so we don’t need to do any UV modifications and pass the input coordinates straight through to the Pixel shader
- Constant buffer for the PS
- A texture sampler, although we could use the default here
- A custom Vertex Shader (see the
- The implementation of the command needs to bind all the needed resources, update the constant buffers and execute the draw command
- The update of the constant buffers is done using the parameters passed through the
DrawCustomEffectCmd::UserEffect::Paramsarray. The CSS propertycoh-custom-effect-float-param-Ncorresponds to theParams[N-1]floating-point parameter.
- The update of the constant buffers is done using the parameters passed through the
- On the HTML side, the code is pretty straightforward. There are several slider inputs which set the custom float parameters through JavaScript (e.g.
customFXel.style.cohCustomEffectFloatParam2 = val / 180 * Math.PI; // Convert deg to rad). That’s all that’s needed for setting the parameters, they are then automatically passed the whole way through the backend.
© 2026 Coherent Labs. All rights reserved.